Last Updated on May 13, 2021
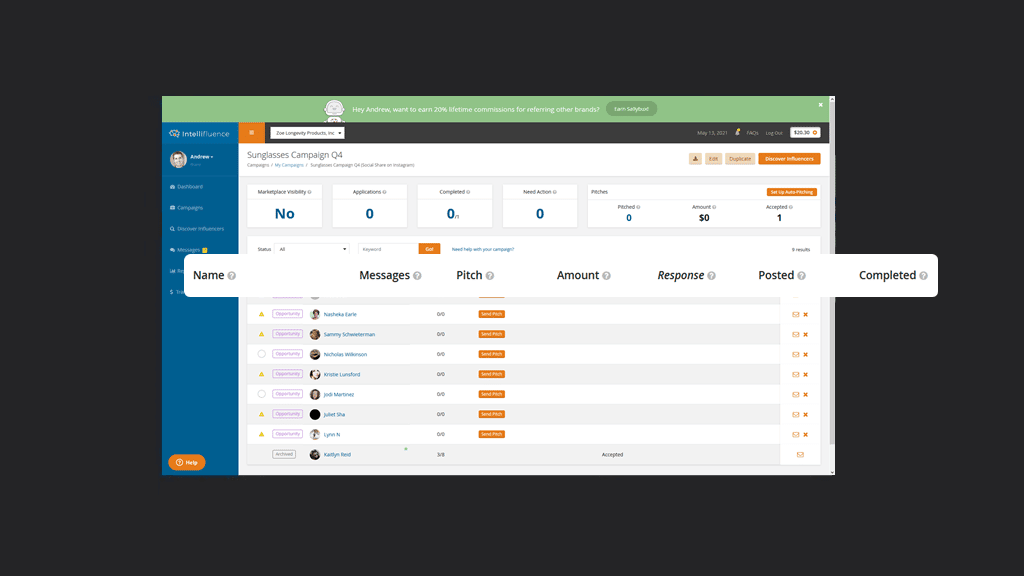
Let’s walk though the process of completing a transaction from start to finish as a brand. First, you should create a campaign. Once your campaign is created, you are automatically redirected to our Discover tool, where you can add influencers to your campaign to pitch. If you make your campaign open to the public to our Marketplace, eligible influencers can apply to be a part of your campaign. Once you find an influencer within Discover, you can add the influencer to your campaign with one click. Whether you add an influencer to your campaign from within Discover or the influencer applies to be a part of your campaign, they will show up within the respective campaign in a transaction row.
Also, if you are offering cash to your influencers, you need to pre-fund your campaign before you pitch. Once you have these two things taken care of, you’re ready to kick off your transaction.
Begin by clicking on the Campaigns menu item and click on the specific campaign.
1. Send Your Pitch
In either scenario, you will kick off the transaction flow by sending the influencer a pitch. Your pitch is populated using the information (such as campaign goal, required work compensation, do’s and don’ts, etc.) you entered when creating your campaign. You can modify the pitch template on an individual basis so you can easily send a custom pitch to a specific influencer. An example would be if you came across an influencer with a substantially larger reach, you could include a higher dollar amount of cash compensation in your pitch in this specific instance.
When sending your pitch, you can specify an expiration date for the pitch. Once the influencer receives your pitch, they can accept the pitch, ask for different terms or decline the pitch. You have complete control over the terms of the pitch (as long as they adhere to our terms of service and the laws in your jurisdiction), so feel free to work with the influencer to establish a desirable outcome for both parties. To save time, you can set up auto-pitching once you have added candidates to your campaign.
You can either keep track of transactions from within the Campaigns screen or the Messages screen. Each transaction includes it’s own message thread, so you can easily keep track of all correspondence in this area without having to use e-mail outside the platform (because we don’t like e-mail any more than you do!). You can also click the Checklist tab to see a checklist of the campaign and stay up-to-date.
2. Mark as Sent (if a Product is Involved)
Upon acceptance by the influencer, it is now time to send the influencer the product (or ordering instructions if they are to order directly from your website). If you are running a cash only campaign, you can skip to the next step. Click Mark Sent and describe the method used to send the product (e-mail, shipped, etc), supply the tracking number and/or estimated delivery date.
If you’re shipping to an influencer in Italy from the United States, for example, be sure to give the influencer a reasonable amount of time to receive the product and try it out. Always try to provide a tracking number so you and the influencer can be on the same page.
3. Wait for the Influencer to complete the work
Once the influencer has received the product, they should mark as received. After they have tried the product or service and have posted the review, they will mark as posted so you can review their work. If they provide the link within the message thread but neglect to mark as posted, you should request that they mark as posted so you will be able to mark as completed once you are satisfied with their work.
4. Review completed work
Once the influencer has marked as posted and you have reviewed their work, you can either Mark as Complete or Request Revisions. To promote a timely transaction flow, you have 7 days to review before the influencer’s work is automatically marked as completed, so keep this in mind.
We’re here to help
In an ideal world, completing a transaction is as simple as this, but in reality, sometimes things can go awry. If an influencer becomes unresponsive or is causing an issue and you have tried to resolve the issue in good faith, you can flag the transaction.
Click on the mail icon associated with the specific transaction to access the message sidebar. Next, click Flag this Transaction in the transaction options dropdown menu located in the top right corner of the message thread.
Appropriate reasons for flagging a transaction include:
1. Requesting help to get any party to comply with the terms of your agreement
2. bringing to our attention any party that has acted in a non-professional manner that violates our Community Standards
3. bringing to our attention any content that doesn’t comply with Intellifluence’s policies
You also have the option to contact an admin if there is a less pressing issue.
If you want to effectively cancel a transaction, you can request that it be archived by an admin. Keep in mind that the ability to archive a transaction is dependent upon how far you are into the transaction and will be examined on a case-by-case basis.
Completing a transaction using Intellifluence is easy and remember, we’re always here to help.

Andrew is the Head of Client Services for Intellifluence and has a background in communications. He is committed to helping brands get the most out of their campaigns and is the co-host of the Influencer Spotlight series.


